Monday 2 November 2009

Mail with Attachment from ServiceDesk Action

As a follow-up of my previous blog an e-mail with attachment can also be created from the Action Menu in the CRMD_ORDER transaction.

A new method CRM_SRVORDER_EXEC_SMART_FORM_A is created in Class Z_CL_DOC_PROCESSING_CRM_ORDER. The Method is linked to a new Action Definition in transaction SPPFCADM and called 'E-mail with Attachments'.

The code is based on the template attachment to Note 935670 - PPF: Sending an SF output with a main document and uses some parts of the BCS_EXAMPLE_4 program.

The first part of the code is the same as descibed in the previous blog.

When the send request is created, recipients and customer name are read from the businesspartner function in the transaction (tables CRMV_LINKPARTNER, BUT000 and ADR6).

With Function 'READ_TEXT' the long-text is read and the variables between '&' are replaced with proper values.

The mail subject is built from the object_id and description of the transqaction.

the retrieved OTF data is converted to PDF with function 'CONVERT_OTF' and attached to the send request with method 'add_attachment' from the CL_BCS Class.

The other attachments are retrieved from table SKWG_BREL and also attached to the send request.

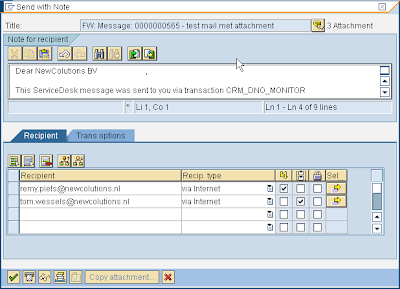
The long text is added to the send request with method set_note from the CL_BCS class and finally the send request can be edited after the method edit is called from the same class.

A window pops up were the body text can be edited, attachments can be added and/or deleted, recipient can be added and/or deleted etc.


Friday 23 October 2009

Mail with Attachments from Transaction Monitor (CRM_DNO_MONITOR)

The implementation of mail with attachment-button starts the same as the print-button implementation.

First with function SSF_FUNCTION_MODULE_NAME the functionname is determined for IP_SMARTFORM = Z_NEWCOL_PRINTFORM.

The LV_OBJECT_ID is read from table CT_REPORT_LIST for the selected line and the LV_OBJECT_GUID is read from table CRMD_ORDERADM_H.

With function CRM_OUTPUT_SINGLE_READ followed by CRM_ORDER_READ the order data is read for the selected entry.

With a CALL FUNCTION FUNCTION_NAME the form is created, sent to spool and printed immediately.

For mailing the form with attachments the print dialog is suppressed with the line:
control_parameters-no_dialog = 'X'.

The following parameters make sure the form is not printed and not deleted:
ls_output_options-immed = ' '. "Print Immediately
ls_output_options-tddelete = ' '. "Delete After Printing


Now the spool_id can be selected from table TSP01 and with this spool_id a pdf is created in the background with function CONVERT_OTFSPOOLJOB_2_PDF.

This function is newly delivered with OSS-Note: 1320163 – Incorrect PDF data Unicode Conversion. Together with the new example program BCS_EXAMPLE_8 from OSS-Note 1324547 – Sending a spool requerst as PDF via e-mail it is possible to create the mail request and add the attachments with the CL_BCS Class (Business Communication Service).


CALL FUNCTION 'CONVERT_OTFSPOOLJOB_2_PDF'
EXPORTING src_spoolid = f_rqident
no_dialog = 'X'
pdf_destination = 'X'
no_background = 'X'
IMPORTING
pdf_bytecount = bin_size
bin_file = pdf_xstring
EXCEPTIONS
err_no_abap_spooljob = 1

The function CONVERT_OTFSPOOLJOB_2_PDF can now create a PDF_XSTRING (this was not possible with the previous version) and the xtring can be added to the mail object directly as attachments with the lines:

pdf_content = cl_document_bcs=>xstring_to_solix( pdf_xstring ).

document->add_attachment( i_attachment_type = 'PDF'
i_attachment_subject = lv_pdf_subject
i_attachment_size = pdf_size
i_att_content_hex = pdf_content ).

The other attachments are selected from table SKWG_BREL:

SELECT * FROM skwg_brel INTO TABLE lt_attach_guid WHERE instid_a = lv_object_guid.

With the following function the attachment is read:

CALL FUNCTION 'CRM_IM_ATTACHMENTS_CONTENT_GET'
EXPORTING
is_doc_id = ls_skwf
IMPORTING
et_content = lv_bcsy
et_content_bin = lt_solix
ev_attach_type = lv_attype
ev_attach_size = lv_size
ev_attach_subject = lv_subject.


And the following method from Class CL_BCS adds the attachment to the mail request:

CALL METHOD document->add_attachment
EXPORTING
i_attachment_type = lv_attype
i_attachment_subject = lv_subject
i_attachment_size = lv_size
i_att_content_text = lv_bcsy
i_att_content_hex = lt_solix
EXCEPTIONS
OTHERS = 1.

At the end the mail request is sent:

w_sent_all = send_request->send( i_with_error_screen = 'X' ).

And the spoolrequest is deleted:

CALL FUNCTION 'RSPO_R_RDELETE_SPOOLREQ'
EXPORTING
spoolid = l_spoolid.


Tuesday 28 April 2009

Personalization of your SAP Logon screen, Splash screen etc

As promised to Patrick the Personalization of SAP will be described in this blog. This will also work as a reminder for myself.

Adding text to the logon screen.

Go to Transaction SE61 and select the document 'General text' (selection via F4 help), and create a text with the name ZLOGIN_SCREEN_INFO in the language defined with profile parameter zcsa/system_language.


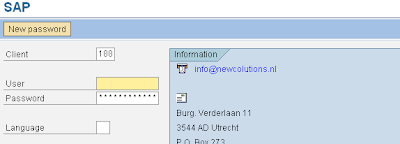
Note that there is space for 16 lines with 45 fixed-font characters each or for approximately 60 proportional space font characters on the logon screen. Title lines (can be recognized by means of format keys starting with a 'U') are highlighted in the display.You may also output icons at the beginning of lines by using an icon code (for example, @1D@ for the STOP icon). You can get a list of icon codes from Report RSTXICON. Pay attention to the codes with two '@' symbols displayed by the report.

Modify/Add picture in 'splash-screen'

First, in transaction SMW0 (SAP Web Repository), select "Binary data for WebRFC applications. The logo can be in bmp format. From this transaction, create a new object, then choose to IMPORT. You must then specify the path to the .bmp object you have saved, and select the option to TRANSFER. To display the picture the MIME type 'image/bmp' must be assigned to an editor '(example: %SystemRoot%\system32\mspaint.exe').

Then, maintain table SSM_CUST via SM30. Change the field START_IMAGE to the name of the object you created in SMW0.

the rippling water on the top right

Changing the rippling water on the top right on all is easy but tedious and requires no change to the SAP system. The file name is 'sapalogo.bmp' and resided in the directory "SAPpcsapguithemesdefault". Looking at this file you can see how it works. Use an editor like Paint and replace each of the SAP ripple images with a morphing image of your own. Make sure the new image is the same size as the original. There are 33 images in the original but you don't need that many.

Thursday 20 December 2007

Add Customer saplogon.ini to your own saplogon

When starting at a new Customer probably one of the first things is to add their saplogon.ini entries to your own


By just replacing yours with theirs you loose (your own entries) so you have to add them one by one. There is another way:

Ask for the complete saplogon.ini from your new customer and store it on your computer:


Create a new shortcut on your desktop (rightclick -> new -> shortcut)

Point to the location of your saplogon.exe (probably: "C:\Program Files\SAP\FrontEnd\SAPgui\saplogon.exe") and at a description to the shortcut and press Finish.

Then rightclick on the newly created shortcut and select properties:


Add the following string add the end of the targetstring: /INI_FILE=C:\yourdirectory\customerlogon.ini

Press OK to save.

Now you can use your new Customer saplogon shortcut!